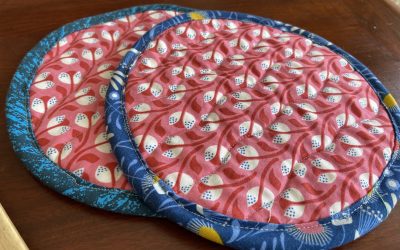
We have some picnics to go to this weekend and although I may make box brownies as my contribution, I decided to make handmade cute pot holders to go with my dish to give to the hostess. This may be my summer staple since I had fun making these and they look really cute!

I love a nice potholder. But my issues with doing a nice binding keep getting in my way! I don't want to take the time to hand sew it and I can't seem to get a nice machine stitched binding. It may look great on the front but messy on the back.
On the other hand, piping and I are great friends. I realized maybe my pot holders just needed piping instead of that traditional binding. They turned out great!
Here is how you can make one too~

~You need to find a 8.5" circle to trace. I used an embroidery hoop but a plate or whatever will work too. 9" is fine too and 8" is OK but getting a little small.
~cut 2 pieces of 100% cotton fabric (i used quilting weight) and 2 pieces of insulbrite- all 4 pieces need to be 8.5" round.
~ 30" of piping rope. Mine is about 1/4" thick (or sometimes I just cheat and cover a store bought binding if I don't have any rope but the store bought is a little skinny for this project.)
~32" strip of 1.5" cordinating fabric cut on the bias
~ 6" strip of 1.5" fabric that is the same fabric as the circles. This will be your loop. Fold this piece in binding and iron flat. It can be on the bias or just with the grain of the fabric.
~You will also need a sewing machine, scissors. pins, cordinating thread, an iron and ironing board.

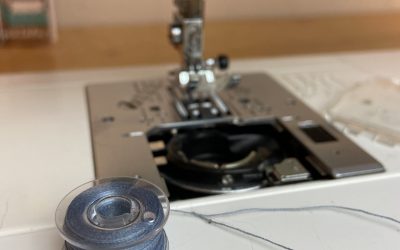
Fold the 32" fabric strip over the 30" of piping rope. Pin every 6". Sew down along the strip to enclose the rope and make piping. See the photo above.

Next, take one of your fabric circles, and sew the piping around the edge of the circles. Have your rope facing in toward the middle of the circle. I don't use pins here since I find it easier to sew a little, adjust, sew a little, adjust, etc. But you can do whatever feels comfortable. Sew along the line you made to enclose the rope in the last step.

Once you sew all the way around the circle, overlap the piping and sew through the layers. See the picture above. Trim off the excess piping and set this piece aside.

Take that 6" piece of binding and sew it closed. This will be your loop to hang your pot holder.

Cross the loop over and pin it to the top of the circle without the piping on it. Layer the 2 circles of insulbrite beneath the circle of fabric. Sew the loop on and trim the extra binding off to match the edge of the circles. 6" will give you enough length to make the loop small or a little longer. See the picture above as reference.

Now pin together the 2 sides- one with the loop and 2 layers of insulbrite and the other with the piping sewn on. Right sides of the fabric should be facing each other. The side with the piping should be facing up. The line of stitches you made to attach the piping will guide you to sew the 2 sides together. This way, your piping will be perfectly even all around your pot holder. See the above picture as your guide for how your project should look at this point. There needs to be an openning of about 3" to turn the pot holder right sides out. Backstitch at both edges of the opening.

Now trim all your seams down a little smaller than 1/4" except at the opening. See the picture above.

Turn your piece right sides out through the opening. Iron nice and flat and fold under the opening to match your edges. See picture above.

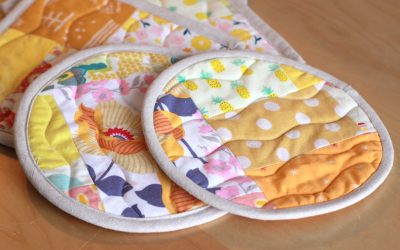
At this point you have lots of options to finish up your pot holder. You can just sew a seam around the edge to close up the opening and flatten the edges or you can do a little quilting design like I did. I did this by marking the center and 4 even sections with pins. Then I just free quilted some loops that crossed over each other to close up the opening.

That is some wonky quilting but it was fun! With some practice and planning, you could make this part really pretty! I did loops, circles, and ups and downs. Lots of possibilites to have fun with your quilting designs!

Hostess gifts for the weekend complete! I plan on making more for myself too and finally throw out those old ugly ones! I hope you enjoyed this tutorial. Please do not sell pot holders you make from this tutorial. Contact me if you want to do them for a fundraiser or something like that. If you do make one, I would love to see it in my Gingercake Tutorials Flickr group. Thanks!!
Have a happy holiday weekend!