Last week I participated in a pop up craft show in downtown Pittsburgh. Although the show was not well attended and I felt silly for not having researched it properly (the location and glamour of who was running it fooled me!) I did create a nice, simple table that I thought would be great to share. This table would be really easy for anyone to recreate on a budget but still look professional. For more detailed info on starting a sewing business from scratch, you can purchase my book,
“>Sewing to Sell!
1.
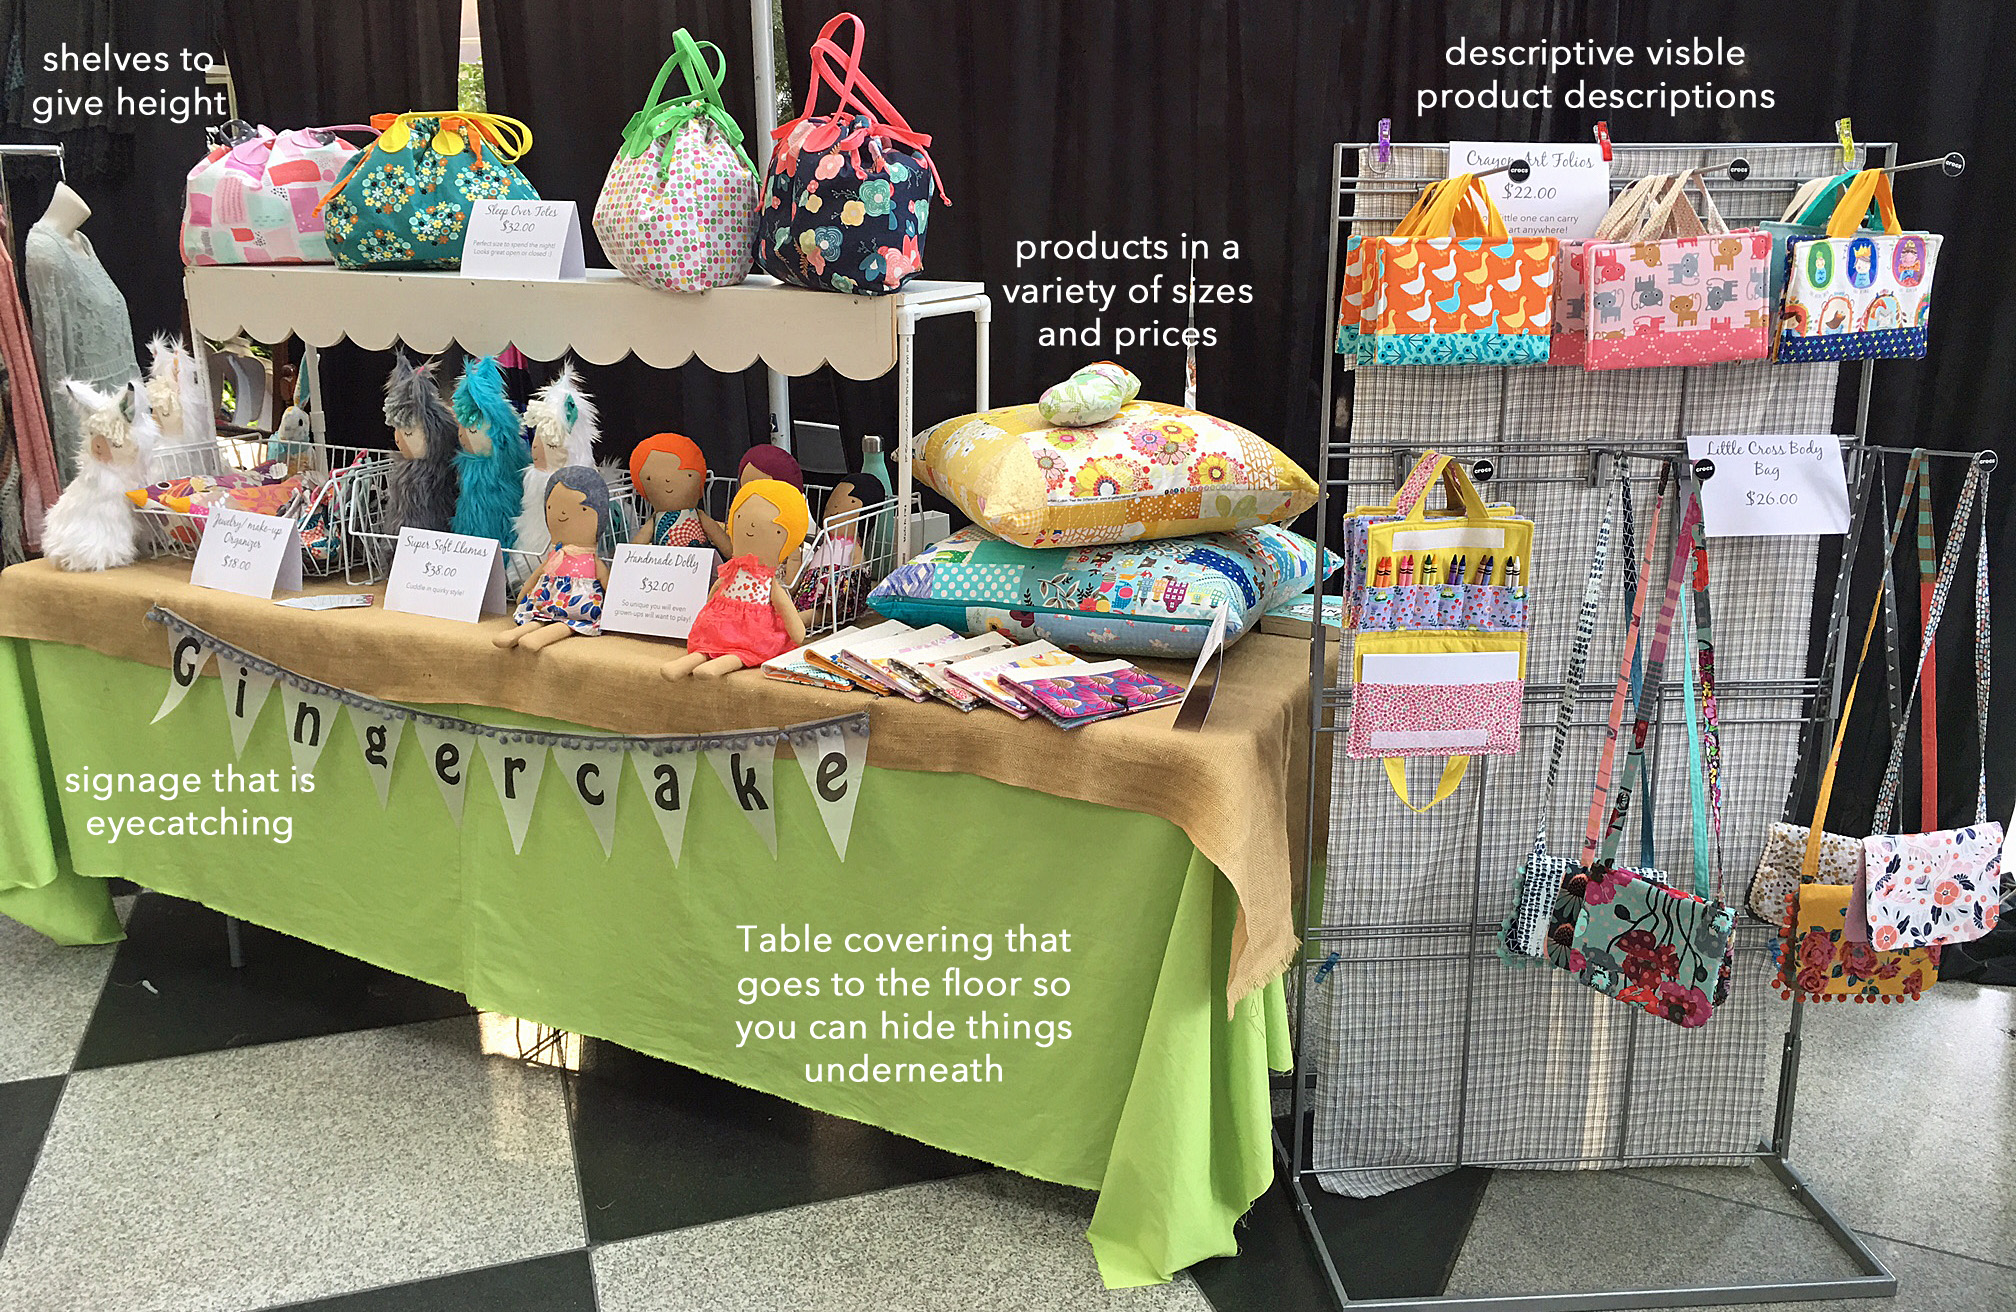
Vertical shelving: It is important that you make use of vertical space. It catches shoppers eyes from farther away and gets your products up to their eye level. This shelf is made using PVC pipes and joints. PVC is cheap, easy to cut to size, sturdy and EASY TO CARRY! To top off the shelf, I used a wooden shelf with a cute trim I found at a construction recycle place. But you could easily use some other kind of trim to make that shelf topper look nice. This is a 5ft long shelf and PVC set up. This means it will fit on both an 8ft or a 6ft table.
2.
Simple table cloths: You are going to need that space under your table to hide boxes and extra supples. Make sure your table coverings fall all the way to the floor. My cloth is yardage of 54” decor fabric. It does not go all the way to the floor on the back side of the table and that grants me easy access to what I need under the table- bags (I bought
these from U-line), extra business cards, snacks, etc. I also covered the top of my table with some burlap for texture. I like how it kinda of tones down the bright colors of all my fabrics and add an earthy base to my products.
3.
Brand Signage: Although you can easily have signs printed by Kinkos or with some planning, Vistaprint, this banner is also an easy option. You can either print or trace the letters of your business on paper, cut it into triangles and sew it all together with some fun trim. This banner was supposed to be a temporary solution for me but I like how it adds some fun decor to my table. It is important to have a name for your business! It adds professionalism and interest. People always come and ask “Why Gingercake?”
4.
Merchandise: What I planned and sewed for this show had several things in mind-
price, size, shape, and customer.
For the price, I wanted a variety of prices- from a $15 jewelry pouch to a $65 quilted 24” square pillow. When I am doing a really big show (like the
handmade arcade) my prices range from $3 ornaments to $150 baby quilts. This is to give lots of options to your customers.
For size, I wanted to give a variety not only for the customer to choose from but also because it give your booth balance. The large items, like the
quilted pillows (which are priced high not only because they were a lot of work but also because they look so great in my booth and attract so many people, that I don’t even mind if they don’t sell so I can use them as props at my next show) and the
sleep over totes which give great size and color to the table display.
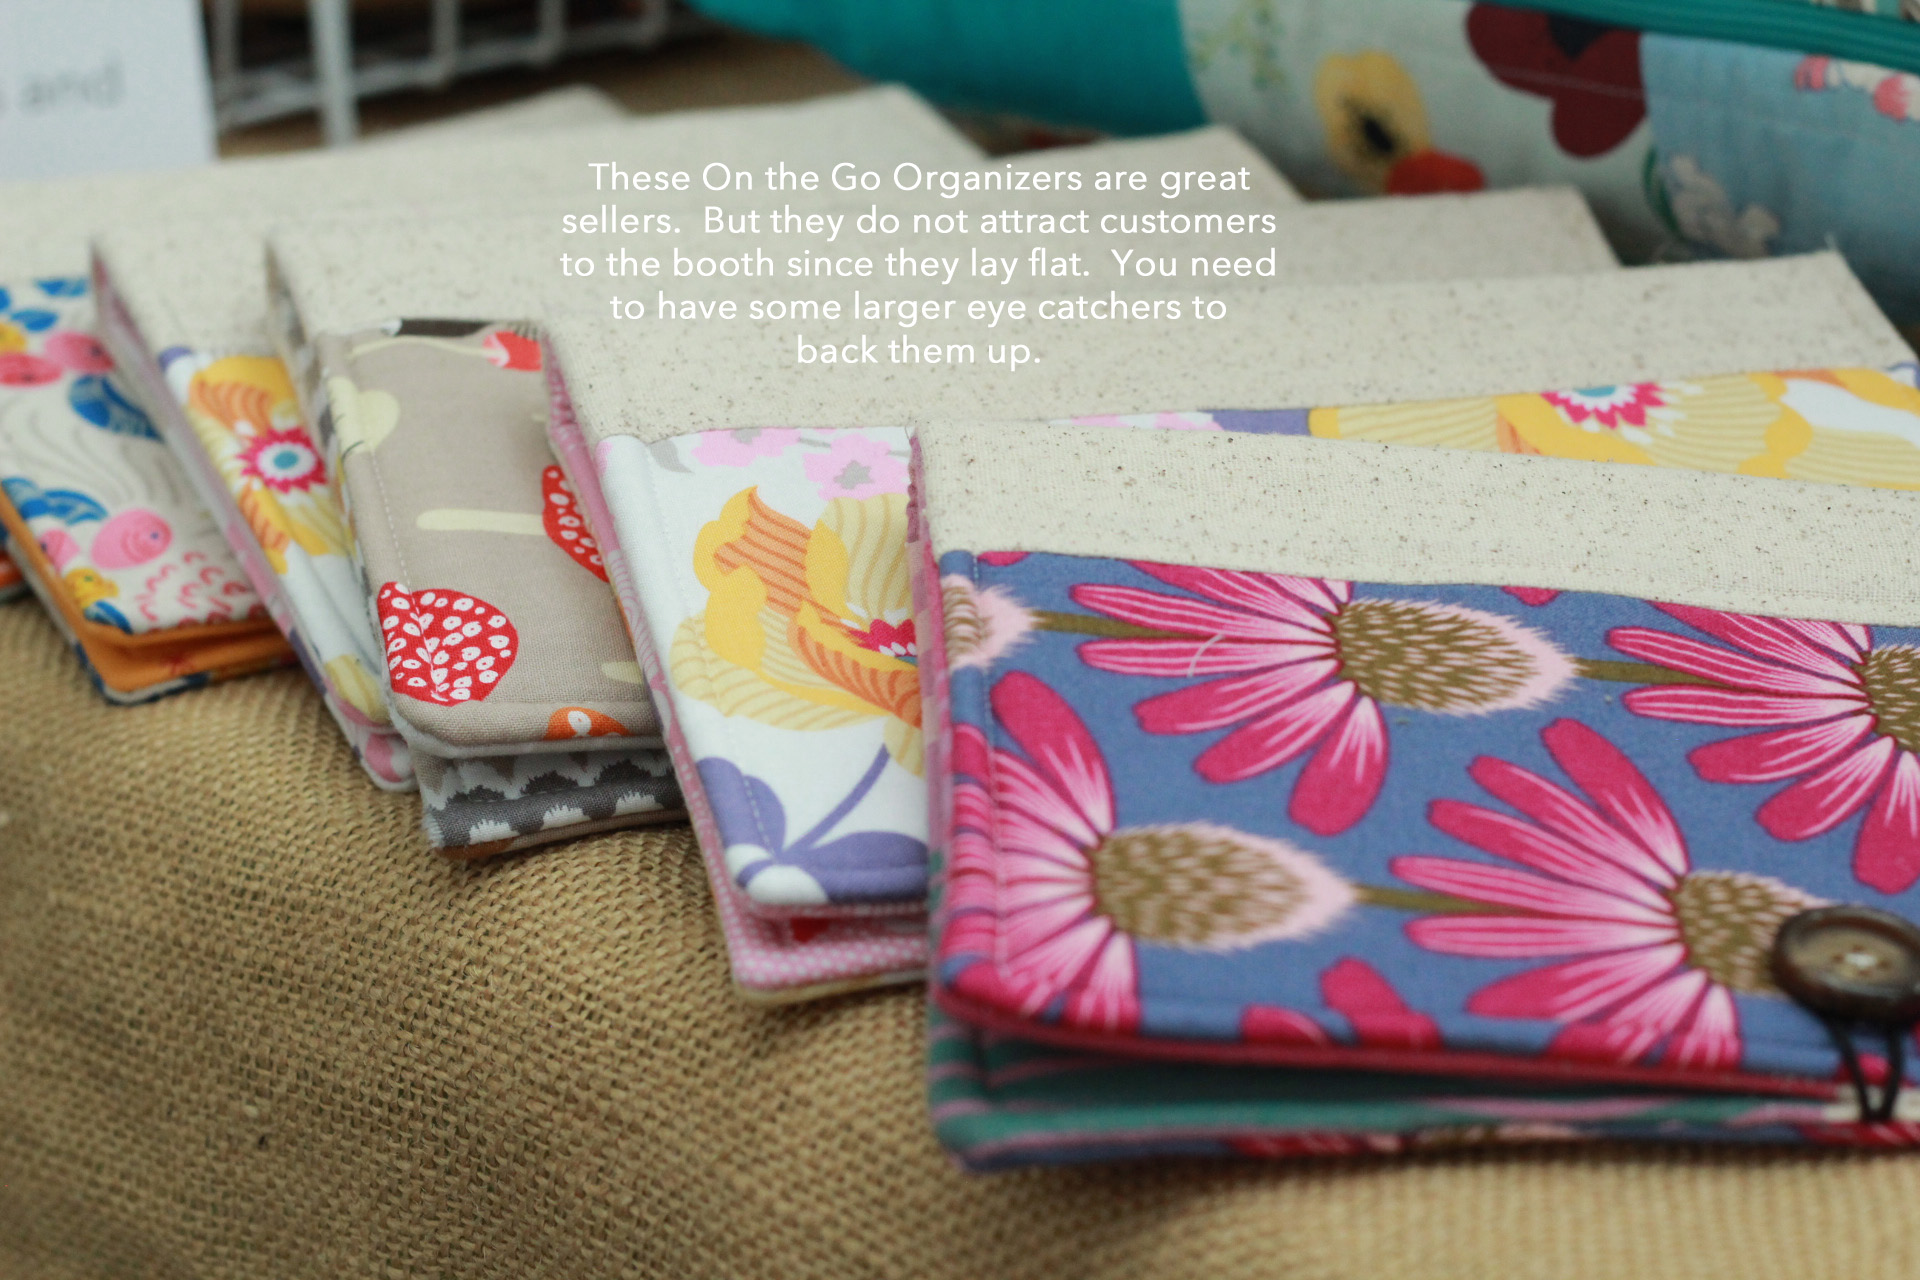
Shape is important to give variety and intrigue your customer also. It’s all about drawing them in and making them stop so you don’t want to present a bunch of small flat things or they wont bother to come over. Again- a show stopper like the big pillows or the faux fur
llamas will help get them to your table even if
the organizes above are better actual sellers.
I try to limit my customer selection to a certain type- kids (mostly girl kids!) and a little something for their mom. You can get pretty jumbled if you go for too many people. Try to focus in on a certain customer or you will confuse the customer and not attract anyone! My booth obviously isn’t going to attract fashion savy 20 year olds but if I see a 6 year old girl walk by with no interest I am usually a little shocked and worried!
4.
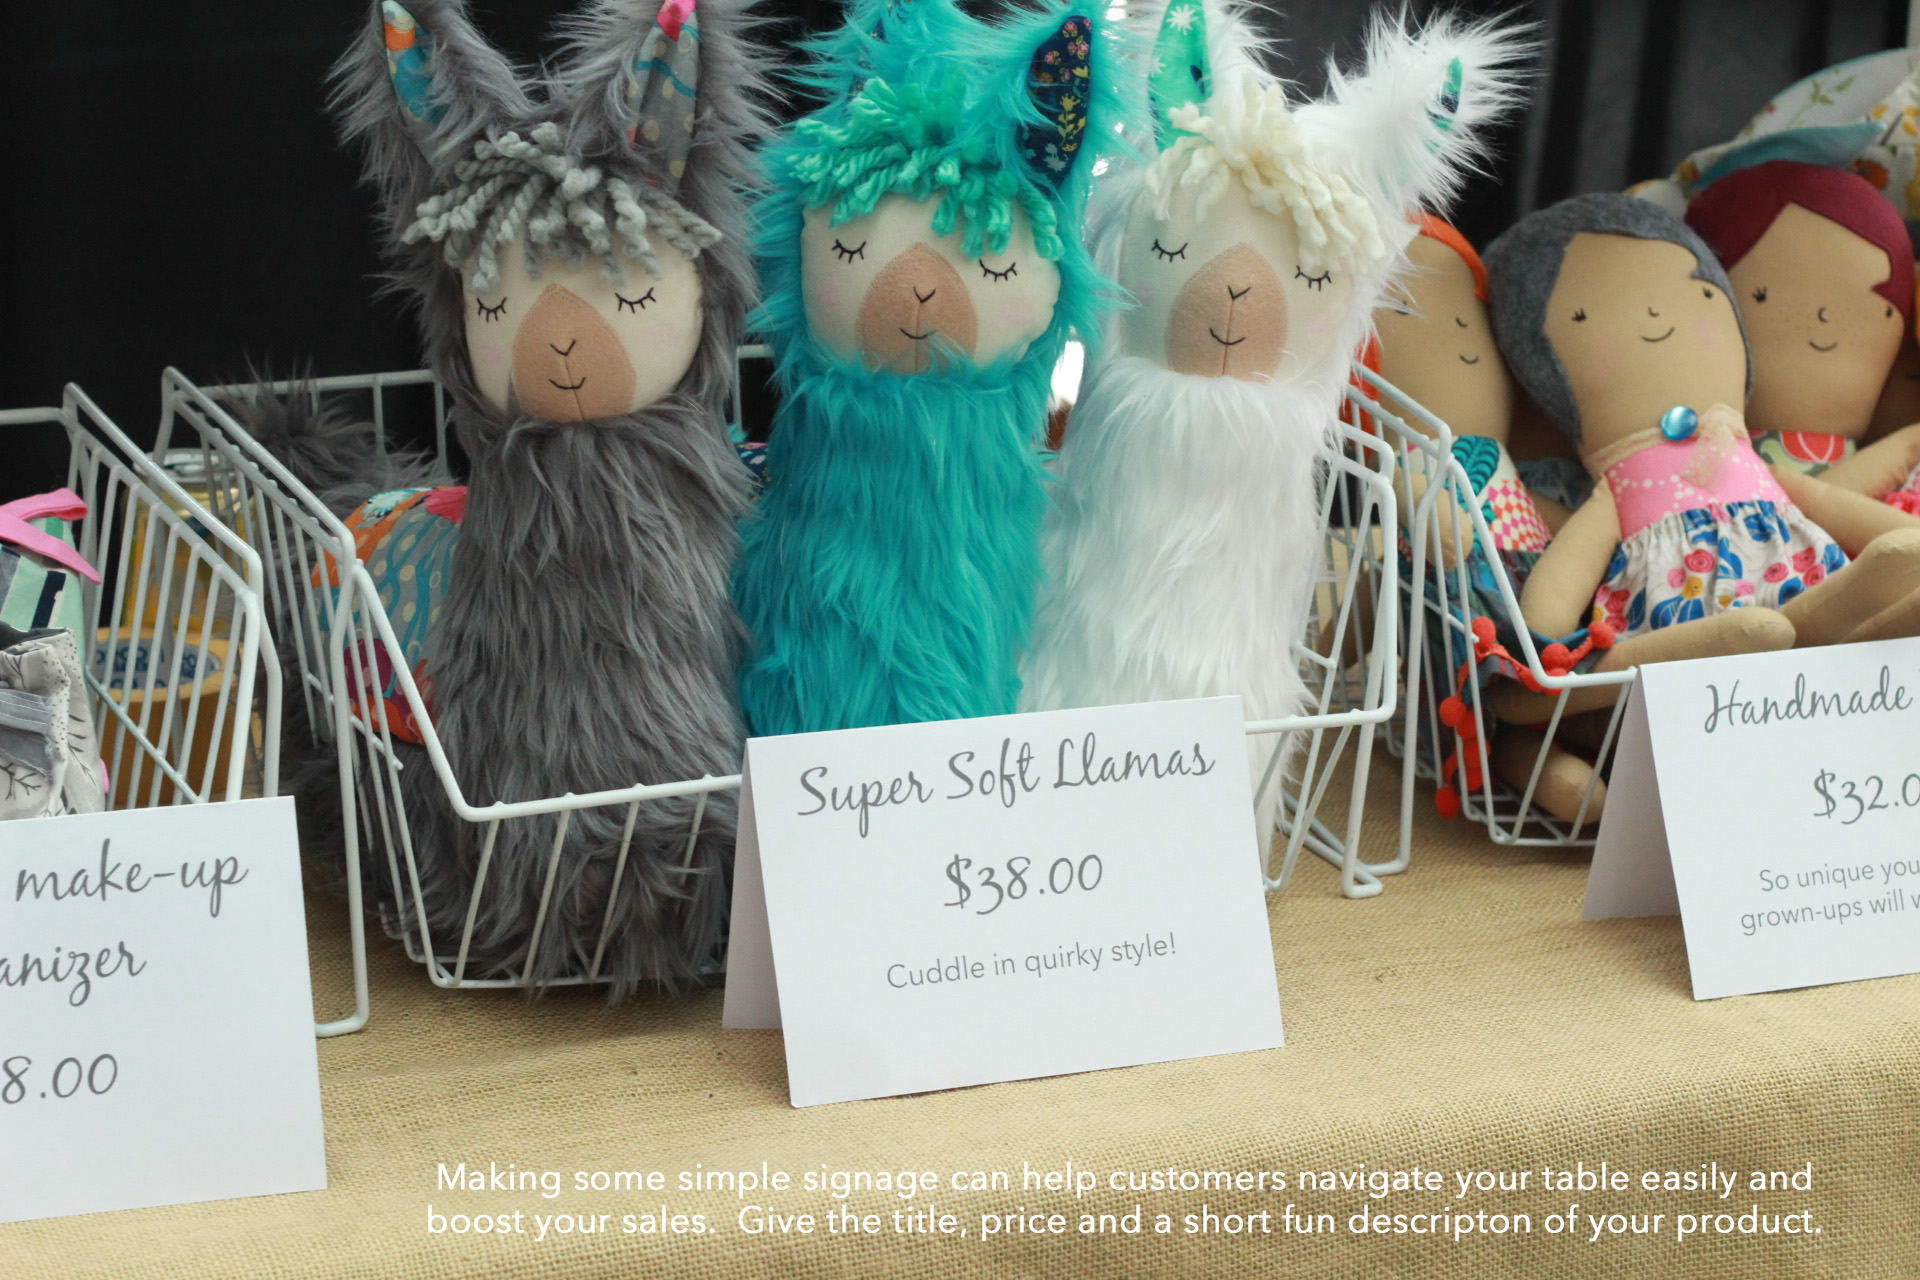
Descriptive product signage is a big help for shoppers and for you as the seller. For a long time, I priced everything individually but I finally realized that even though it was obvious to me what I made, some people still couldn’t figure it out! I made the above signs on white card stock and simply folded them in half. I always include a cute (but descriptive title), the price, and then describe how to use the item. For
my crayon holders (a best seller for sure!), I always say sometime like “keep them busy at restaurants and doctors office without screens!”
5.
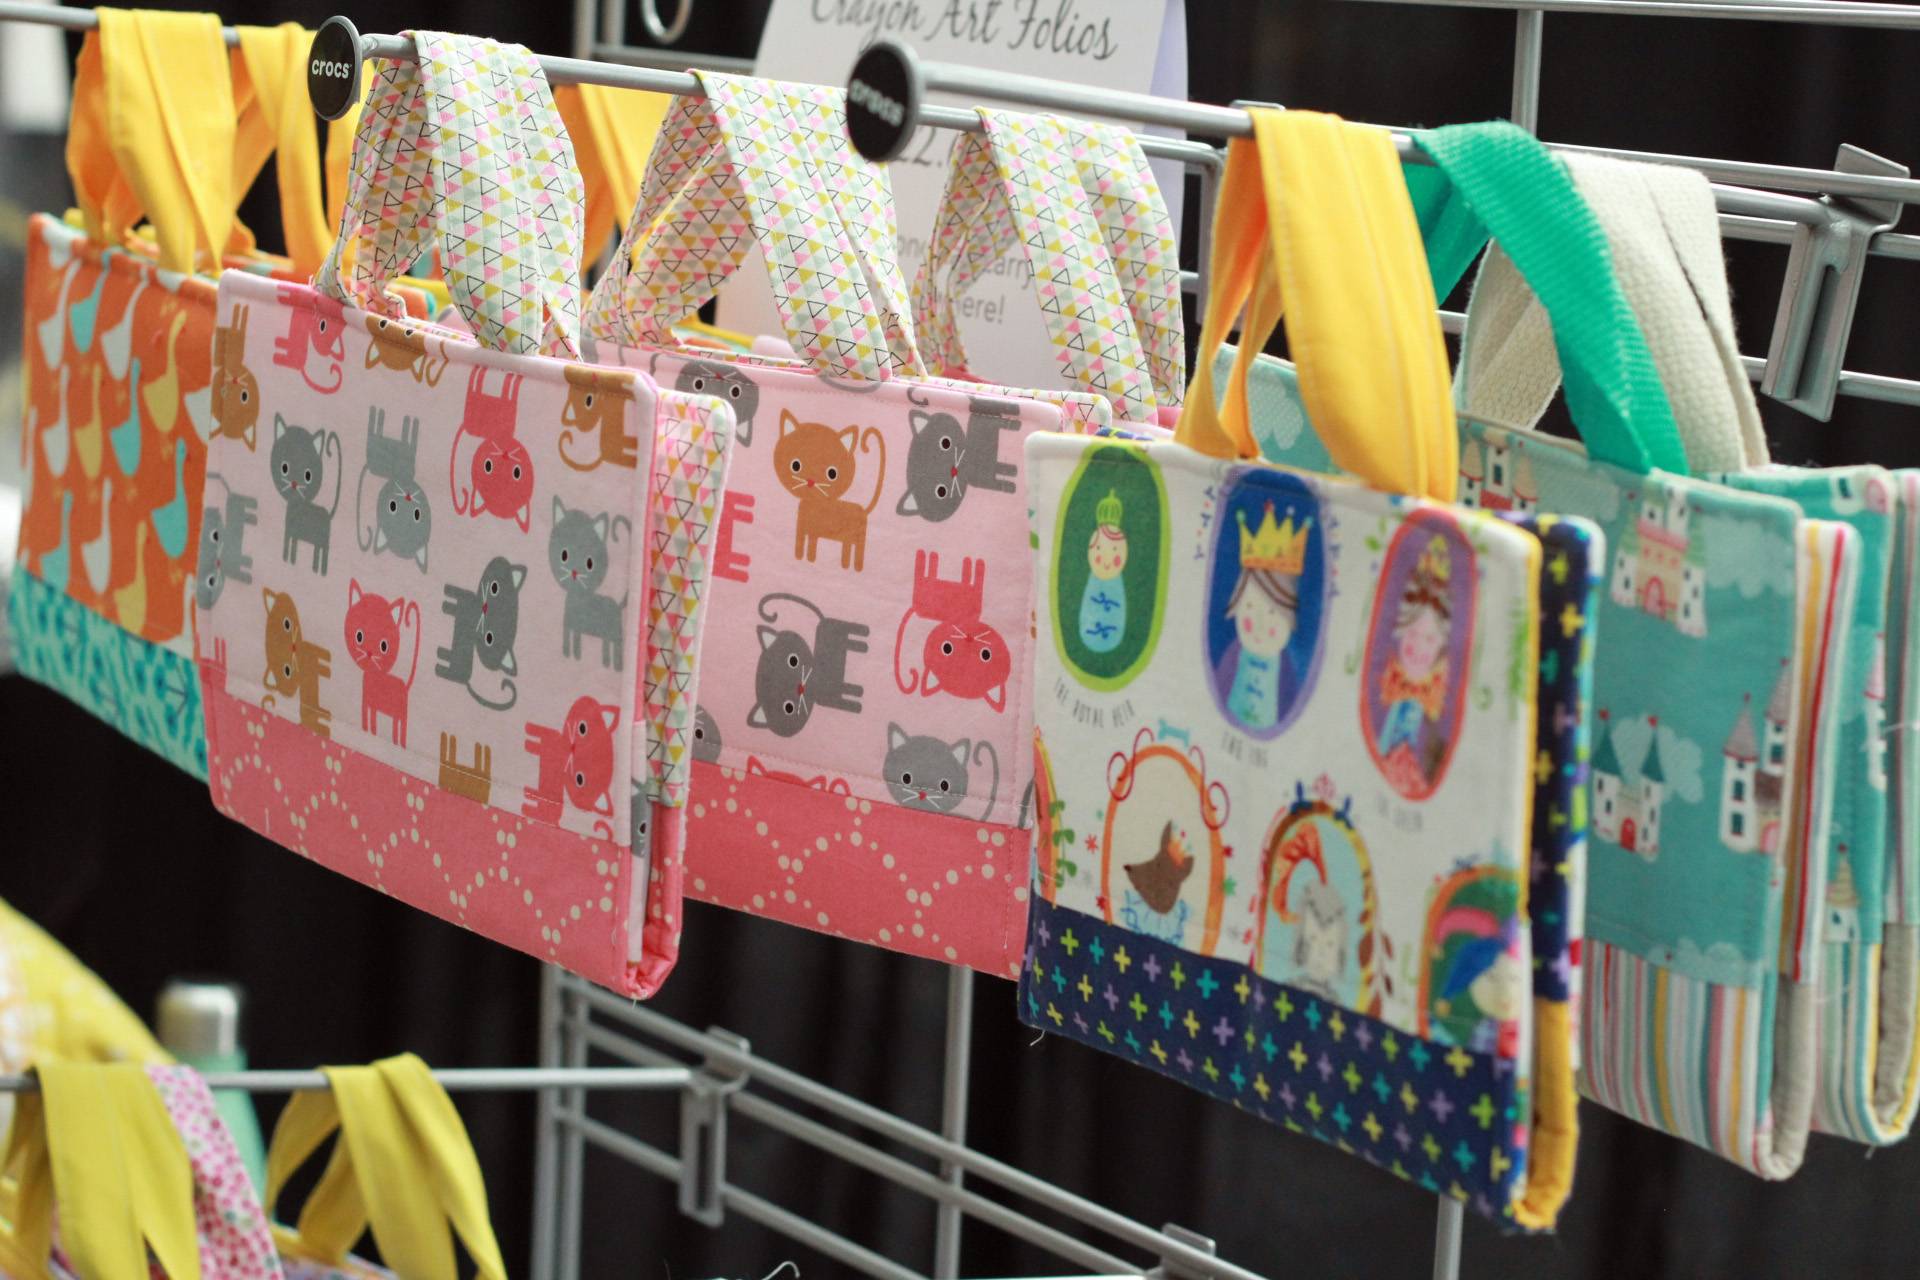
Additional height creating lightweight display items are a huge help if you can find them. If you have never been a show before, you can’t always easily gauge how much size they are going to give you. These types of display pieces are really helpful since they can stand alone OR be tucked behind your table to show more of your items and add that height we talked about earlier. Although I have a heavier version of metal grating I have used in the past (and I paid a few $100 for), I recently found this piece that used to be crocs display! I saw it empty and asked the store owner if I could have it. He said yes- that it was just going to be thrown away. Score! You could also use a trellis from the garden center or look around and get creative at the home improvement store. Just remember to keep it light weight and simple so you can move it around easily.
6. Lastly, I like to use
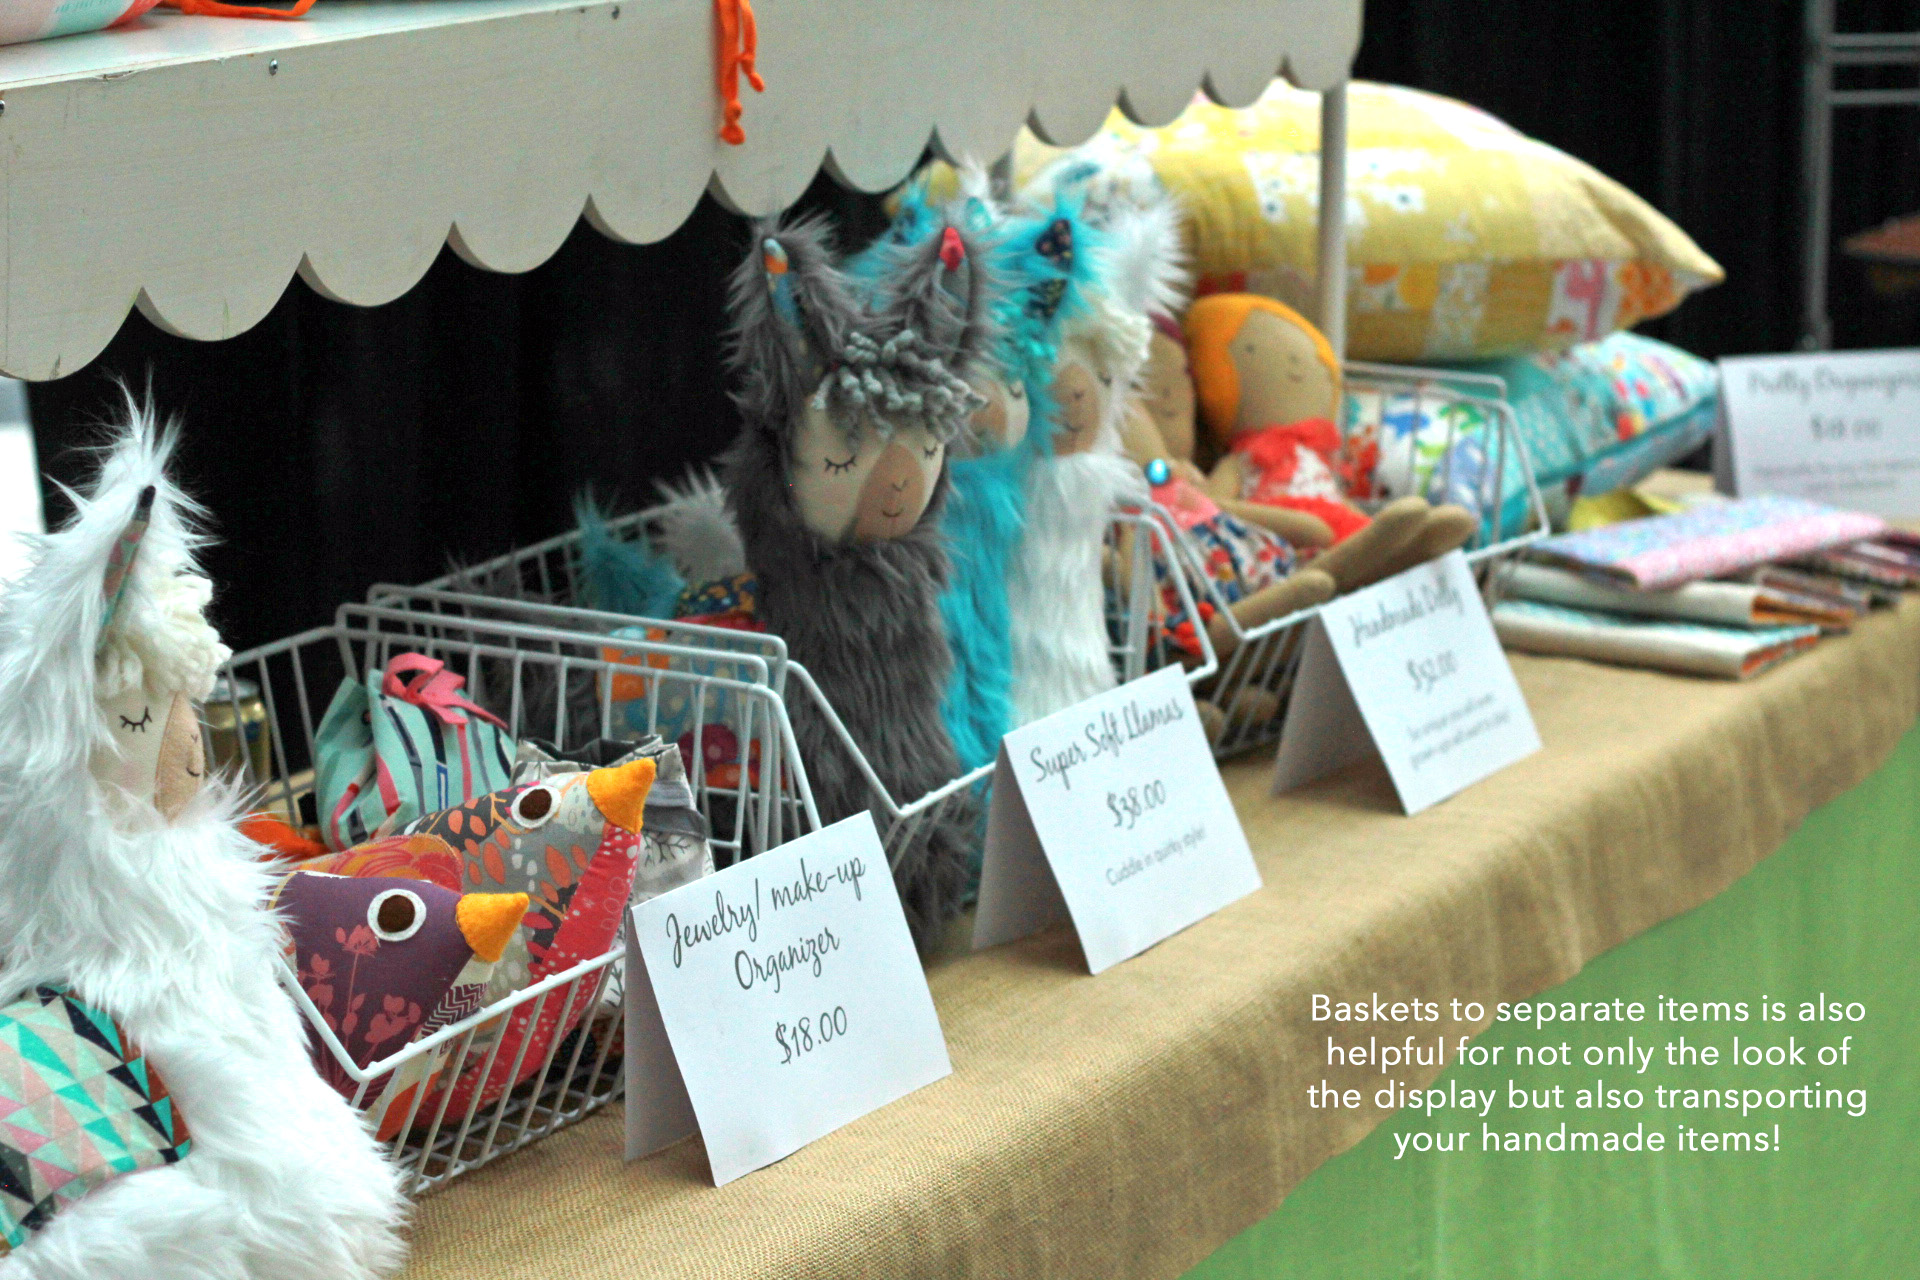
wire baskets to separate my items not only for the look it gives to the table, but also for the ease it gives to transporting your stuff. These stackable wire baskets are easy to transport, show obvious separation of my items, and also don’t detract from the over all look of my table. I found them at Aldi a few years ago for about $6 each. They also support my signage easily!
Just remember that your display is unique and try to keep it fresh. When you are out shopping for everyday things, keep a look out for things that might enhance your table- things that will bring height, help organization, and also show your pretty things in the best possible way. Again, my book,
“>Sewing to Sell, has additional help to get your sewing business off on a great foot with info like this and much more 🙂
 1. Vertical shelving: It is important that you make use of vertical space. It catches shoppers eyes from farther away and gets your products up to their eye level. This shelf is made using PVC pipes and joints. PVC is cheap, easy to cut to size, sturdy and EASY TO CARRY! To top off the shelf, I used a wooden shelf with a cute trim I found at a construction recycle place. But you could easily use some other kind of trim to make that shelf topper look nice. This is a 5ft long shelf and PVC set up. This means it will fit on both an 8ft or a 6ft table.
2. Simple table cloths: You are going to need that space under your table to hide boxes and extra supples. Make sure your table coverings fall all the way to the floor. My cloth is yardage of 54” decor fabric. It does not go all the way to the floor on the back side of the table and that grants me easy access to what I need under the table- bags (I bought these from U-line), extra business cards, snacks, etc. I also covered the top of my table with some burlap for texture. I like how it kinda of tones down the bright colors of all my fabrics and add an earthy base to my products.
3. Brand Signage: Although you can easily have signs printed by Kinkos or with some planning, Vistaprint, this banner is also an easy option. You can either print or trace the letters of your business on paper, cut it into triangles and sew it all together with some fun trim. This banner was supposed to be a temporary solution for me but I like how it adds some fun decor to my table. It is important to have a name for your business! It adds professionalism and interest. People always come and ask “Why Gingercake?”
4. Merchandise: What I planned and sewed for this show had several things in mind- price, size, shape, and customer.
For the price, I wanted a variety of prices- from a $15 jewelry pouch to a $65 quilted 24” square pillow. When I am doing a really big show (like the handmade arcade) my prices range from $3 ornaments to $150 baby quilts. This is to give lots of options to your customers.
For size, I wanted to give a variety not only for the customer to choose from but also because it give your booth balance. The large items, like the quilted pillows (which are priced high not only because they were a lot of work but also because they look so great in my booth and attract so many people, that I don’t even mind if they don’t sell so I can use them as props at my next show) and the sleep over totes which give great size and color to the table display.
 Shape is important to give variety and intrigue your customer also. It’s all about drawing them in and making them stop so you don’t want to present a bunch of small flat things or they wont bother to come over. Again- a show stopper like the big pillows or the faux fur llamas will help get them to your table even if the organizes above are better actual sellers.
I try to limit my customer selection to a certain type- kids (mostly girl kids!) and a little something for their mom. You can get pretty jumbled if you go for too many people. Try to focus in on a certain customer or you will confuse the customer and not attract anyone! My booth obviously isn’t going to attract fashion savy 20 year olds but if I see a 6 year old girl walk by with no interest I am usually a little shocked and worried!
 4. Descriptive product signage is a big help for shoppers and for you as the seller. For a long time, I priced everything individually but I finally realized that even though it was obvious to me what I made, some people still couldn’t figure it out! I made the above signs on white card stock and simply folded them in half. I always include a cute (but descriptive title), the price, and then describe how to use the item. For my crayon holders (a best seller for sure!), I always say sometime like “keep them busy at restaurants and doctors office without screens!”
5. Additional height creating lightweight display items are a huge help if you can find them. If you have never been a show before, you can’t always easily gauge how much size they are going to give you. These types of display pieces are really helpful since they can stand alone OR be tucked behind your table to show more of your items and add that height we talked about earlier. Although I have a heavier version of metal grating I have used in the past (and I paid a few $100 for), I recently found this piece that used to be crocs display! I saw it empty and asked the store owner if I could have it. He said yes- that it was just going to be thrown away. Score! You could also use a trellis from the garden center or look around and get creative at the home improvement store. Just remember to keep it light weight and simple so you can move it around easily.
 6. Lastly, I like to use wire baskets to separate my items not only for the look it gives to the table, but also for the ease it gives to transporting your stuff. These stackable wire baskets are easy to transport, show obvious separation of my items, and also don’t detract from the over all look of my table. I found them at Aldi a few years ago for about $6 each. They also support my signage easily!
 Just remember that your display is unique and try to keep it fresh. When you are out shopping for everyday things, keep a look out for things that might enhance your table- things that will bring height, help organization, and also show your pretty things in the best possible way. Again, my book, “>Sewing to Sell, has additional help to get your sewing business off on a great foot with info like this and much more 🙂
