FEET! They can be confusing. Which one do I use? Why are there so many to choose from? What in the world does this one do? Sewing machines usually come with a set of feet for different uses. There are many extra ones you can purchase for specialty sewing- from tiny rolled hem feet, to ruffling feet, to a darning foot. Do you need all these acessories to be a better sewist?? Certainly not! They can be nice if you get into a certain type of sewing, but I am going to share the basics with you that will help you to accomplish 99% of the sewing you will ever need to do 🙂

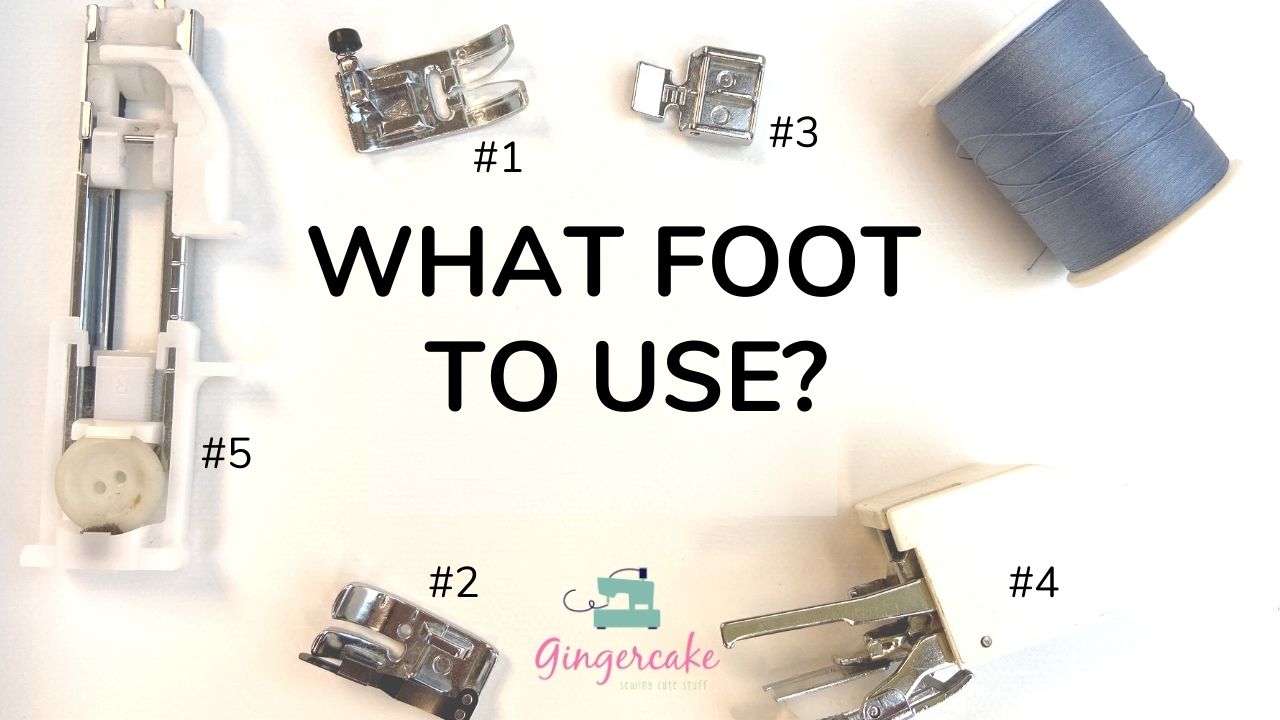
I basically just use 5 sewing machine feet (also called presser feet).
The first (pictured above as #1) is my zig zag foot. That foot is the basic foot and you can do 90% of your sewing with it. So, if you only had one foot, this would be it. You can sew straight! You can sew zig zag! You do a stretch stitch! You can do a hem stitch! You can sew with wovens or knit fabrics with this foot. It’s the basic foot.
The second foot (in the above picture as #2) is the 1/4” foot or also called the patchwork foot. It has an exact 1/4” between where the needle comes down the right side edge. This makes it the right foot to use when piecing quilt blocks and patchwork. Other feet might also have 1/4” distance there too, but this foot is specially designated for this purpose. When piecing quilt blocks together, it is important to be exact to get those nice points and corners. So, always switch to this foot when doing that kind of sewing.
The third foot (pictured as #3) is a zipper foot! I love my zipper foot and I would not recommend trying to sew on zippers without one. Watch the video below to see how I easily use one to sew on a zipper and then switch the foot to the other side to perfectly top stitch the zipper.
Fourth (pictured as #4) is the walking foot. The walking foot is fantastic for sewing layers and slippery/ stretchy fabrics. Like knits or other fabrics that might bunch up easily with a regular foot. I use it in bag making to help with layers. Again, watch the video for an example 🙂
Finally (pictured as #5) is the button hole foot. An automated button hole foot is very helpful. My last machine did not have an automated button hole foot and if you follow the directions (gotta read that manual friends!) it also worked fine. In the video below, I show you exactly how my foot works and it is like magic. Especially considering how people used to have to sew button holes by hand and now most machines have these quick feet to make it happen. Thank you sewing machine engineers 🙂
Want to make more like this?
I have a great pattern to take your skills to the next level!


